Code on Github

Performance Video:

Final Documentation Live Coding

In our group, Mike was in charge of the music, Ruiqi worked on the visuals, and Rebecca worked on both and also controlled the midi value, and the Ascii texts.

Visual

Personally, I’ve started thinking of Hydra more as a post-processing tool than a starting point for visuals. I’ve gotten a bit tired of its typical abstract look, but I still love how effortlessly it adds texture and glitchy effects to existing visuals. That’s why I chose to build the base of the visuals in Blender and TouchDesigner, then bring them into Hydra to add that extra edge.

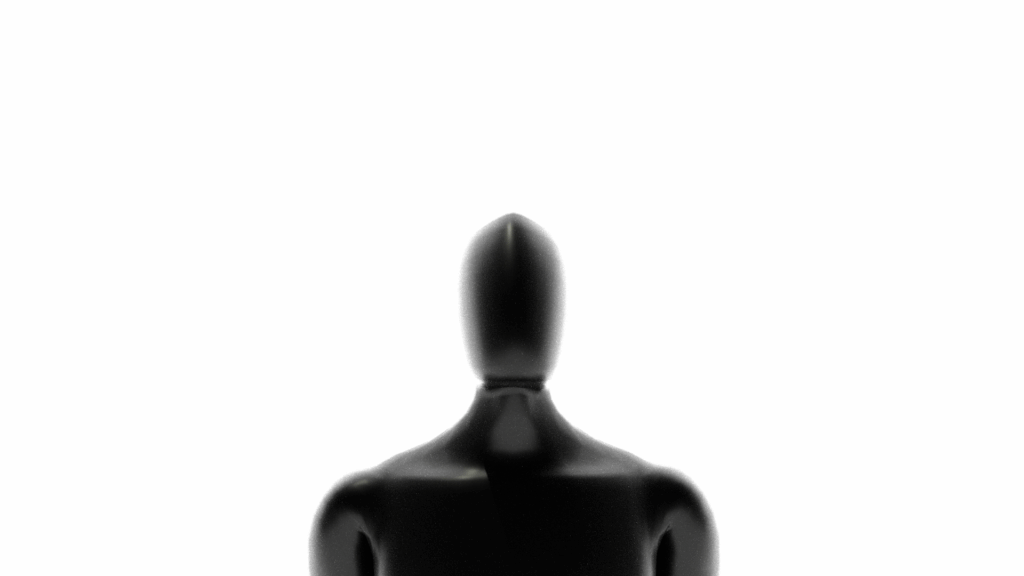
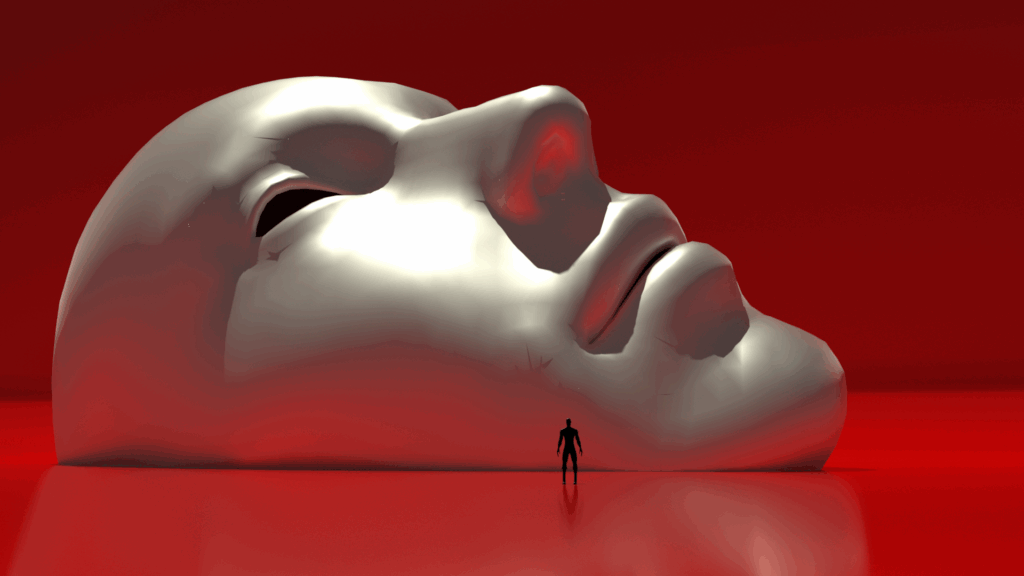
As always, I’m drawn to a black, white, and red aesthetic—creepy and dark visuals are totally my thing. I pulled inspiration from a previous 3D animation I made, focusing on the human body, shape, and brain. In the beginning, I didn’t have a solid concept. I was just exploring faces, masks, bodies—seeing what looked “cool.” Then I started bringing some renders into Hydra and tried syncing up with what Mike was creating. We quickly realized that working separately made our pieces feel disconnected, so we adjusted things a bit to make the whole thing feel more cohesive.

At one point, I found myself overusing modulatePixelate() and colorama()—literally slapping them on everything. That’s when I knew I needed to change things up. So I went for Touch Designer and used instancing to build a rotating visual with a box, which gave the piece a nice shift in rhythm and form.

In the end, I’m proud of what I made. The visuals really reflect my style, and it felt great combining tools I’ve picked up along the way—it made me feel like a real multimedia artist. I’m also super thankful for my teammates. Everyone put in so much effort, and even though some issues popped up during the final performance, it didn’t really matter. We knew we had given it our all. Big love to the whole cyber brain scanners crew.

Here are some images and videos we made in Blender and TouchDesigner for the performance:

Audio

For the whole performance, we were trying to create upon several keywords: space, cyberpunk, and huge distortion. I drew inspiration from Chicago house music, glitch, and industrial music for how to make the sounds raw and wild, to correspond to the sketches for the visual.

At the early iterations of the performance, our theme was a space odyssey for cyborgs. So I thought a continuous beeping sound from a robot would fit in to start the performance. Though later we built something slightly different, we still agree this intro is effective in grasping the audience’s attention, so we chose to keep it.

For the build up, I really like the idea of using human voices to serve as a transition into the second part. And to echo with the theme, I picked a recording from crews on Discovery, a space shuttle orbiter with NASA on testing the communication system.

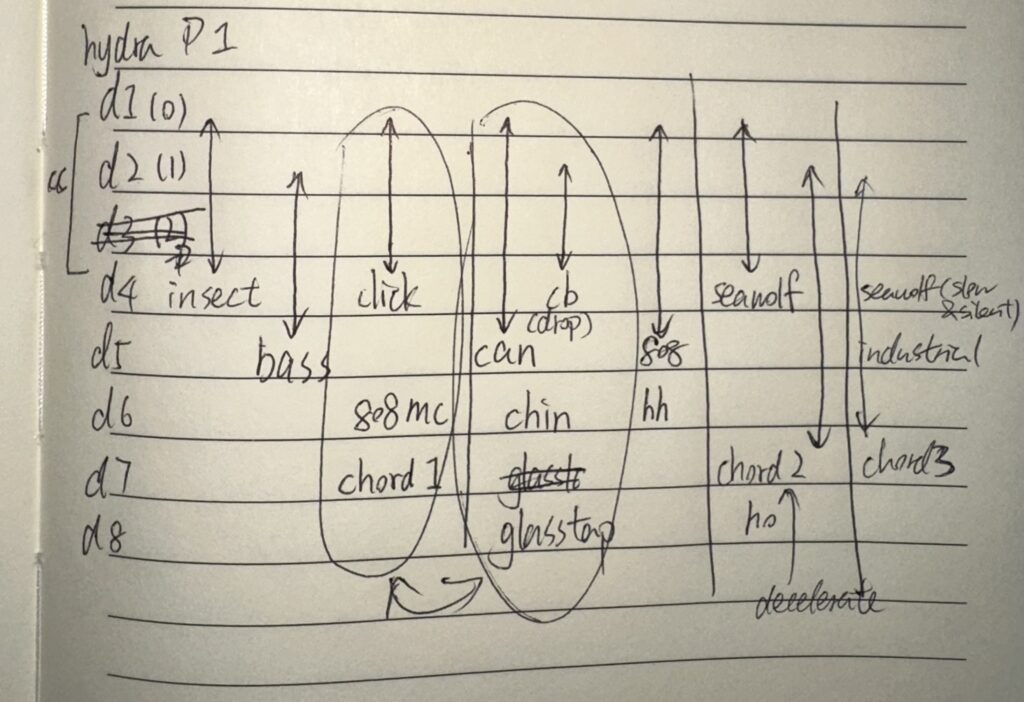
The aesthetic for the visual reminded me to keep the audio minimalistic. Instead of layering too many different tracks as the performance progressed, I used different variants of the main melody by adding effects like lpf, crush, and chop. The original sample for creating the main melody is a one-shot synth, and these effects helped make it sound intense, creepy and distorted.

In the second part, we wanted to make the audience feel hyped, so I focused more on the sound design for drums. The snare created a depth for the sound, and the clap can make the audience interact with us. And the glitch sample was adopted according to the pixel noise cross from the visual. 

It’s really amazing to see how we have evolved as a group since the very first drum circle project, and it is a pleasure to work together and exchange ideas to make everything better.

Communication with the audience

To do live coding as a performance, we decided to use some extra methods to communicate with the audience. Typically, in a performance, the performer might communicate with the audience directly via microphone, which might undermine the consistency of the audio we are creating. Live coders might also type something in comments, which takes advantage of the nature of live coding, but the comments might be too small compared to the visual effects, and it might be hard for the audience to notice them.

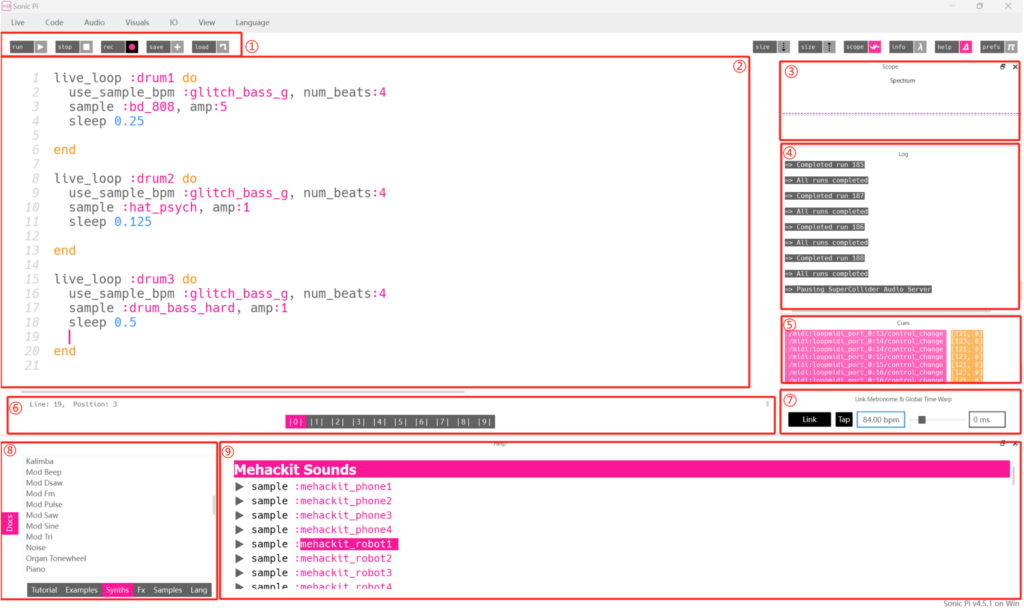
Finally, we came up with the idea of creating ASCII art. ASCII art has been a part of the coding community for a long time, especially when it comes to live coding. In one of the most well-known live coding platforms, Sonic Pi, users will encounter an ASCII art title of this software. We would like to hype up the audience by adding some ASCII art to our flok panel, which could also utilize the flok layout and let those who don’t read code pay attention to the code panel.

We really managed to hype up the audience and express our big thanks and love to the community that has been supporting us throughout this semester.

👽👽👽💻🧠❤❤❤

After reading this article, I watched a performance by Derek Bailey. It is a combination of live guitar performance and dancing. The sound that Derek Bailey made is completely different from the typical impression we have on guitar. It doesn’t include delicate chords and is more like some random experiments on the instrument. Though it’s not a great pleasure to listen to it, I still appreciate how he combined guitar, percussion, and dance in a single performance and made everything out of nothing. These improvisational performances also happen in Jazz sessions, in which the players often jam together, communicating with each other only by instruments. Though they are using traditional instruments, I think they have something in common with live coders, which is the enthusiasm for creating new patterns in performance and not being afraid to make mistakes.

My impression of DJ performances used to be a performer standing behind a big DJ controller, mixing tapes and creating effects during the performance. However, things seem to be different nowadays. The DJs are actually playing pre-setted audios and visuals, so the role they play in the performance is actually more like a conductor who lets the audience dance to the beats. It is interesting that computer programs are leading people to two extremes: creating completely repeatable music by using preset patterns and creating completely random music by utilizing random functions. Though the performances with pre-recorded audio can still be exciting, I think the spirit of jamming should be celebrated, and that is what live coders are doing, just like what Bailey did in his performance. The computer is the tool and approach, but the spirit is what really matters.

Hydra code:

let p5 = new P5()
s0.init({src: p5.canvas})
src(s0).
repeat(()=>ccActual[3],()=>ccActual[3]).
//here
scrollX(1,1).
luma(0.9).
mult(osc(3,2,2),0.9).
// rotate(1,1).
kaleid(()=>ccActual[3]).
rotate(1,1).
out()
p5.hide();
p5.strokeWeight(4);
p5.fill(20);
p5.textSize(200);
p5.background(0);
let parameter=p5.random(1);
p5.draw = ()=>{
  p5.stroke(p5.map(cc[2],0,1,0,255),p5.map((1-cc[2]),0,1,0,255)*parameter,p5.noise(time)*255*parameter);
  //p5.background(0);//comment this line
  let v = p5.noise(time);
    p5.push();
    p5.translate(p5.width / 2, p5.height / 2);
    p5.noFill();
    p5.fill(255);//uncomment this line
    var radius = v*p5.width*cc[0]*5;
    var angle = p5.TAU / (ccActual[0]);
    p5.beginShape();
    for (var i = 0; i <= (ccActual[0]); i++) {
      var x = p5.cos(angle * i) * radius;
      var y = p5.sin(angle * i) * radius;
      p5.vertex(x, y);
        p5.rotate(p5.sin(time));
    }
    p5.endShape();
    p5.pop();
    //p5.blendMode(p5.MULTIPLY)
}
render(o0)


src(o0).scale(1.01).blend(o1,.1).out(o0)


hush()

let p5 = new P5()
s1.init({src: p5.canvas})
//here
src(s1).
repeat(()=>ccActual[0],()=>ccActual[0]).
luma(0.08).
mult(osc(4,2,2)).
out(o1)
p5.hide();
p5.noStroke();
// p5.strokeWeight(4);
p5.fill(255);
p5.textSize(200);
p5.draw = ()=>{
  p5.background(0);
  let v = p5.noise(time);
    p5.push();
    p5.translate(p5.width / 2, p5.height / 2);
    p5.text(ccActual[0],0,0);
    p5.pop();
}
render(o1)

let p5 = new P5()
s1.init({src: p5.canvas})
//here
src(s1).
luma(0.08).
mult(osc(4,2,2)).
pixelate(()=>ccActual[4],()=>ccActual[4]*2).
blend(solid(0,0,0),()=>ccActual[5]).
out(o1)
p5.hide();
p5.noStroke();
// p5.strokeWeight(4);
p5.fill(255);
p5.textSize(200);
p5.draw = ()=>{
  p5.background(0);
  let v = p5.noise(time);
    p5.push();
    p5.translate(p5.width / 2, p5.height / 2);
    p5.text(ccActual[0],0,0);
    p5.pop();
}
render(o1)

hush()

Tidal code:

p 104 $ ccv "1" # ccn "5" # s "midi"

do
d2 $ s "cp cp cp cp "  #gain 3 #krush 9
d3 $ s  "sn*4" # gain 4
d4 $ qtrigger $ filterWhen (>=0) $ slow 1 $ s "supersaw*8" # note(scale "major" ("[6, 4] [8,6] [6,4] [5,3][6, 4] [6,4] [8,6] ~")) #gain 10
p 101 $ ccv "2" # ccn "1" # s "midi"
p 102 $ ccv (segment 64 (slow 4 (range 0 127 saw))) # ccn "2" # s "midi"
p 103 $ fast 2 $ ccv "8 4 <5 3> <6 7>" # ccn "0" # s "midi"
p 104 $ ccv "4 2 3 5" # ccn "3" # s "midi"
p 105 $ ccv (segment 64 (slow 2 (range 20 127 saw))) # ccn "4" # s "midi"
p 106 $ ccv "0" # ccn "5" # s "midi"


hush

do
d3 $ s  "sn*4" # gain (range 2 6 $ slow 4 $ saw) # room (range 0 1 $ slow 4 $ saw) # krush "<0 9>" # speed (range 1 6 $ slow 4 $ saw)
d4  $ qtrigger $ filterWhen (>=0) $slow 1
  $ every 2 (const $ s "supersaw*8"
                  # note(scale "major" ("[0,2,4] [5,7,9] [4,6,8] [3,5,7]")))
  $ s "supersaw*8"
  # note(scale "major" ("[6, 4] [8,6] [6,4] [5,3][6, 4] [6,4] [8,6] ~"))
  # gain 10
--d5$ qtrigger $ filterWhen (>=0) $ slow 1 $ s "supersaw*8" # note(scale "major" ("[6, 4] [8,6] [6,4] [5,3][6, 4] [6,4] [8,6] ~")-21) #gain 10
p 101 $ ccv "2" # ccn "2" # s "midi"
p 104 $ fast 2 $ ccv "4 2 3 5" # ccn "3" # s "midi"

do
d6 $ s "bd*8" #gain 2 #krush 20 #room 0.2 # speed (range 1 6 $ slow 4 $ saw)
d3 $ s  "sn*4" # gain (range 2 6 $ slow 4 $ saw) # room (range 0 0.2 $ slow 4 $ saw) # krush "<0 9>" # speed (range 6 12 $ slow 4 $ saw)


hush

Tidal Cycles code:

--part 0
do
d4 $ s "insect*2 ~ ~"  # gain 2
d1 $ ccv "127 31 ~ ~" # ccn "0" # s "midi"

--part 1
do
d4 silence
d5 $ qtrigger $ filterWhen (>=0)$ s "jungbass:2"
d2 $ ccv "<120 100>" # ccn "1" # s "midi"

hush

--part 2

do
d5 $ s "can*4" <| n (shuffle 4 $ run 4)# gain 4
d1 $ ccv "127 30 100 10" # ccn "0" # s "midi"
d4 $ fast (range 1 4 $ slow 8 sine) $ s "cb"  # room (range 0 1 $ slow 4 $ saw)
d2 $ fast (range 1 4 $ slow 8 sine) $ ccv "<127 64 30 100>" # ccn "1" # s "midi"
d6 $ s "chin" <| n (shuffle 4 $ run 4) # gain (range 0 3 $ slow 4 $ saw)
d8 $ every 2 (fast 2) $ s "glasstap:1 glasstap:2"  #krush 30

do{
d4  $ fast 2 $  s  "click:2*2 ~ ~ click:2*2 ~ ~" #krush 20   # room (range 0 1 $ slow 4 $ saw);
d1 $ fast 2 $ ccv "127 64 ~ ~ 80 32 ~ ~" # ccn "0" # s "midi";
d7 $ fast 2 $ s "sine*4" # note(scale "<major minor shang chinese minor>" ("[0, 4, 7] [0, 5, 9] [0, 4, 9] [2, 5, 9]")+"<1 2 5>");
d5 $ qtrigger $ filterWhen (>=0) $ seqP [
  (0, 1, s "808mc" <| n (run 4)),
  (1,2, s "808mc" <| n (run 8)),
  (2,3, s  "808mc" <| n (run 16)),
  (3,4, s "808mc" <| n (run 8)),
  (4,5, s "808mc" <| n (run 4))
] #krush (range 0 9 $ slow 4 $ saw) #gain 2
}

do
d8 $ qtrigger $ filterWhen (>= 0) $ s "superhat*4"
    # note ("[6, 10, 2]" -"<1 1 2 5>")
    # gain 1.2
    # krush "<0 9 27>"
    # room 0.5
d6 $ qtrigger $ filterWhen (>= 0)  $ every 2 (const $ s  "super808*8" # note ("[6, 10, 2]" -"<1 1 2 5>")  # gain 1.2 # krush 15 # room 0.5  )
    $ s "~"
d2 $ qtrigger $ filterWhen (>= 0) $ ccv "<[100 10 60 30 100 10 60 30 ] ~>"#ccn "1" # s "midi"


hush

--part3
do
  d4 $ s "seawolf*2" <| n (slow 1 $ shuffle 2 $ run 2) #gain 2 #krush 9
  d2 $ ccv " 127 64" # ccn "1" # s "midi"

do
  d7 $ fast 0.5 $ s "sine*4" # note(scale "minor" ("[0, 4, 7] [0, 5, 9, 12] [0, 4, 9, 12] [2, 5, 9, 11, 14]")+"<1 2 3 4 5>")
  d3 $ fast 0.5 $ ccv "120 20 120 15" #ccn "3" #s "midi"
  d8 $ fast 0.5 $ s "ho?" <| n (shuffle 6 $ run 6)


do
d4 silence
d6 silence
d8 $  s "industrial" <| n (run 8)
d7 $ slow 4 $ s "sine*8" # note(scale "minor"("[0, 4, 7, 10, 14] [2, 5, 9, 12, 16] [0, 4, 7, 11, 14] [0, 5, 9, 12, 17]")-"<1 2 3 4 5>")#gain (range 1 0 $ slow 8 $ saw)
d1 $ slow 2 $ ccv " 127 64" # ccn "0" # s "midi" 
d3 $ slow 1 $ ccv "<40 ~>" # ccn "3" # s "midi"

hush

Hydra Code:

hush()

//part1
solid(0.11, 0.11, 0.58).
layer(solid(0.2,0.2,1)
.mask(noise(()=>cc[0]*5+2, 0.3)
  .posterize(10)
  .diff(noise(()=>cc[0]*5+2, 0.3).posterize(4).scrollX(0.01))
  .thresh(0.1, 0.1)
  .invert()
  .luma(0.1)))
  .layer(
  shape(99, ()=>cc[1]+Math.sin(time)*0.1)
  .diff(shape(99, ()=>cc[1]*0.99+Math.sin(time)*0.1))
  .thresh(0.1)
  .repeat(()=>cc[1]+1,()=>cc[1]+1)
  .scale(0.5,window.innerHeight/window.innerWidth,1)
  .luma(0.1))
  .out()


//part 2
solid(0.2, 0.2, 1)
.layer(
shape(4,0.5)
  .scale(1,0.1,2)
  .color(0.5,0.5,0.8)
  .luma(1,1)
  .scrollX(0.1,()=>cc[0]*-0.1)
  .kaleid(10)
  .scale(0.8,window.innerHeight/window.innerWidth,1))
  .layer(
    shape(4,0.5)
    .scale(1,0.1,2)
    .color(0,0,0.8)
    .luma(0.1,1)
    .scrollX(0.1,()=>cc[1]*-0.1)
    .kaleid(40)
    .scale(0.4,window.innerHeight/window.innerWidth,1))
  .modulate(noise(4,()=>cc[3]))
  .out()


// solid(0,0.6,1).out(o2)
//
// hush()
//
// shape(100, 0.1, 0.2).repeat(3)
//   .thresh(0.5)
//   .scrollX(0,()=>cc[0])
//   .scrollY(0,()=>cc[0])
//   .modulate(
//     noise(5,1))
//   .blend(o1,0.5)
//   .blend(o2,0.5)
//   .out()


  // src(o0).
  //   blend(o1,0.1).
  // out(o0)
  //
  // gradient([1,2,cc[1]]).
  // mask(shape(6,()=>cc[0]*0.3)).
  // modulate(osc()).
  // luma(0.5,0.1).
  // scrollX(() => Math.sin(time) * 0.5).
  // pixelate(cc[1]*300,()=>cc[1]*400).
  // repeat(()=>ccActual[0]/10,()=>ccActual[0]/10).
  // out(o1)

  // shape(5).
  // scale(4,window.innerHeight/window.innerWidth,1).
  // modulateScale(noise(() => Math.sin(time)*1.5)).
  // scrollX(0.1).
  // kaleid(100).
  // scale(4,window.innerHeight/window.innerWidth,1).
  // // rotate(() => Math.sin(time) * 0.5).
  // luma(0.5,0.1).
  // color(()=>cc[0]).
  // out(o1)


  // src(o0).
  //   blend(o1,0.1).
  // out(o0)
  //
  // hush()
  // //part 1
  //
  // gradient([1,2,cc[1]]).mask(voronoi(()=>ccActual[0]/10+1,1,ccActual[0]/100+0.1)).posterize(10, [0.1, 0.5, 1.0, 2.0]).kaleid(99).scale(1,window.innerHeight/window.innerWidth,1).
  // layer(
  //   shape(4,0.5).
  //   scale(1,0.01,2).
  //   luma(0.1,1).
  //   scrollX(()=>cc[2]-0.1).
  //   kaleid(50).
  //   repeat(()=>cc[2]*2).
  //   rotate(()=>cc[2]).
  //   scale(1.5,window.innerHeight/window.innerWidth,1)
  // ).
  // out()

Organization:

I want to describe the feeling of a sudden rain in this project.

The soundtrack is divided into 4 parts: introduction, beats, chords and additional sounds. Before the rain started, there were some sounds of insects, indicating it was a tranquil summer night. After the bass sounded, it started raining, and the raindrops fell onto different objects. The chord described the vibe of the rain. It started light and gentle, became harder and stronger, and finally diminished. The visuals also simulate the rain by using noise and circles to imitate how raindrops fall onto water.

After reading this article, I took a look at the documentation of Ryoichi Kurokawa’s artworks.

His combination of natural landscapes and digital visuals is incredible: in his work Rheo, he used a lot of binding and shaking lines to form a bunch of waves that might suddenly turn into the landscape of a river and then shake and flow with the audio. In syn_, he also utilized this technology to create a smooth transition from digital patterns to natural objects, which demonstrates how technology has brought more possibilities to the art industry.

From my point of view, multi-sensory stimulation and transition is the core of his art. It’s not only the transition between digital effects and natural images but also the transition between simple and complicated content, which brings a strong sensation to the audience when combined with the immersive experience of visuals, audio, and vibrations. It seems that the sensations can resonate.

I also really enjoy how he shows his teenage passion in his artwork: in his work Unfold, he presents nebulas and planets in the universe. The canvas is quite simple and clean, as it only contains the main object on display and a completely black background, which resembles what Kubrick had done in 2001: A Space Odyssey, and this artwork is as immersive and attractive as that film.

Interestingly, according to the article, Kurokawa’s studio is not connected to the Internet, while his artwork seems to be the product of cutting-edge technology. This can be a reflection of how we might utilize technology in our lives, as it might be useful but distractive.

Overview of Sonic Pi

Released in 2012, Sonic Pi is a live coding environment based on the programming language Ruby. It is initially designed by Sam Aaron in the University of Cambridge Computer Laboratory for the purpose of teaching computing lessons in schools. It allows users to use up to 10 buffers to create audio and can create visual effects via other platforms like p5js and Hydra.

As Sam Aaron wrote in the tutorial of Sonic Pi, this software encourages users to learn about both computing and music through play and experimentation. It provides instant feedback for students at school, and as it produces music instead of typical text outputs, it’s more attractive to students compared with traditional coding environments like Java or Python. It also allows users to connect computers with instruments and make remixes in the software.

Interface of Sonic Pi

The interface of Sonic Pi can basically be divided into 9 parts:

  1. Play Controls
    • Play control buttons are responsible for starting and stopping sounds. Clicking Run initiates the current track, and clicking Stop will stop all running code.
    • Record button enables users to save audio played in Sonic Pi with high fidelity.
    • Save and Load buttons enables users to load .rb files from their computers and save the current code as .rb files.
  2. Code Editor
    • Users can write code and compose or perform music here.
  3. Scope Viewer
    • The scope viewer allows users to see the sound waves played on both channels.
  4. Log Viewer
    • Displays the updates within the program.
  5. Cue Viewer
    • All internal and external events (called cues in Sonic Pi) are automatically logged in the Cue Viewer.
  6. Buffer Switch
    • Lets the user switch between 10 buffers provided by the software.
  7. Link Metronome, BPM scrubber and timewrap setter
    • Link Metronome allows users to link the software to local metronomes and synchronizes BPM with the metronome.
    • The Tap button allows users to tap manually in a specific speed, then measures the BPM and automatically adjusts the BPM in Sonic Pi.
    • The BPM displayer shows the current BPM, and users can modify it.
    • Timewrap setter allows the user to manually set whether to trigger every sound earlier or later.
  8. and 9. Help system
    • Displays the tutorial for Sonic Pi. The user can check out all documentations and preview the samples via the help system.

Performance Demo

Reflection: Pros and Cons of Sonic Pi

Sonic Pi, as an educational software, has done a great job by embedding detailed tutorials and documentation in the software. Its large collection of samples and synthesizers allows the users to make all kinds of music. However, the quality of samples is not very stable and requires lots of learning and adjustments to produce high-quality music.