Idea:
The initial thought that came to mind when I started the composition project was to make something soothing that would ease me and everyone that listens to it into the spring break that’s coming up. The piece was supposed to be soothing and full of joy from beginning to the end.
Building the harmonies:
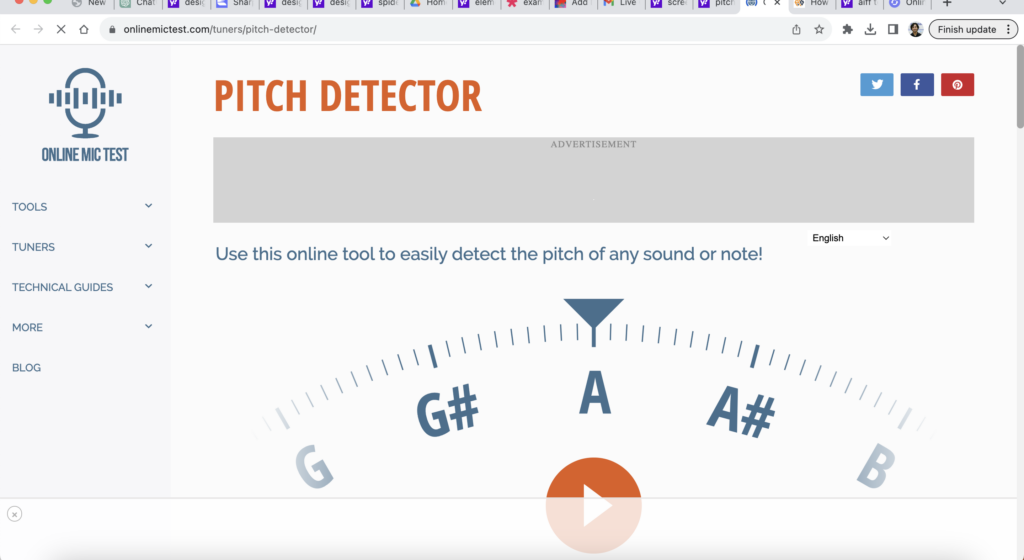
The composition relies heavily on harmonies. The beat used is a very simple one using kicks and snares. The actual essence is in the melody of the piece. First, I played four basic chords on the superpiano – g major, e minor, c major and d major. Then, I’d sing different notes over these chords and then go to this online pitch detector website to detect the pitches of my own voice when I sang over the chords, and use other instruments within Dirt samples to play those notes/pitches. Every thing that I have built upon the four base chords came like this.
However, doing this wasn’t as easy as it sounds. Because different instruments have different timbres and even when the notes sounded good while singing, they sounded very weird on different instruments. So, everything I used in the piece was selected intentionally and with a lot of search. Also, I wanted to add some sort of a flute within the piece. I asked a friend to play the flute, recorded it and included it in the DirtSamples to get the flute in their (although it sounded super distorted for some reason within Tidal Cycles).
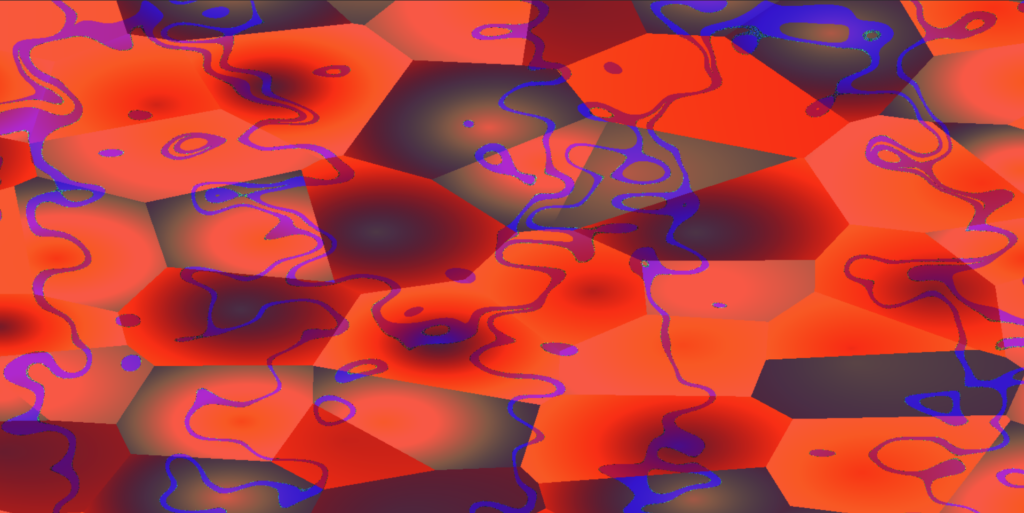
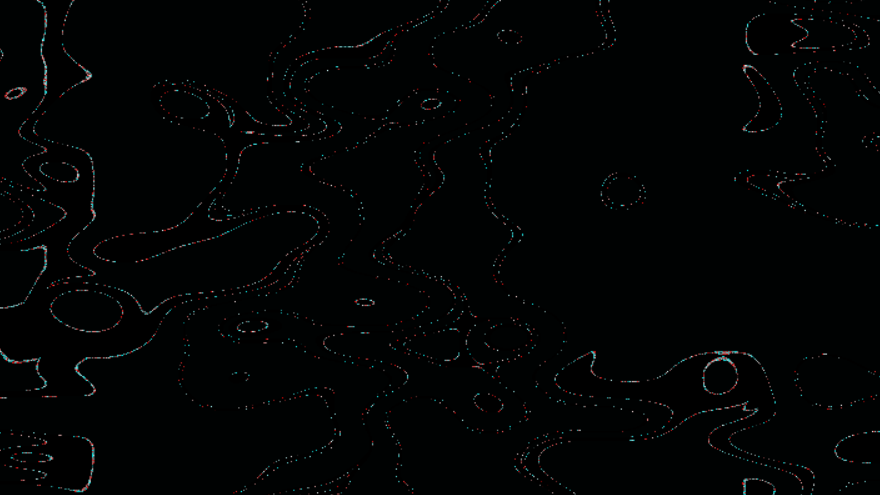
Playing with the Visuals:
The visuals didn’t need a lot of time to create. I had this idea of a star that gets gradually excited as time goes by to be the story. So, I made a shape and made it go crazy with time – with change in numbers, motion and colors, at the end, it multiplied to cover the whole screen. And, I feel the feeling of joy was conveyed.
Video (with an annoyingly choppy recording) and Code:
Tidal Code:
chorus = do {
  d1 $ qtrigger $ seqP [
    (0, 8, slow 4 $ s "superpiano*8" # up "d4 e4 fs4 g4" # gain (1.2) # room 0.9 #krush 4 #lpf (range 2000 3000 saw) #sustain 2),
    (0, 16, slow 4 $ s "superpiano*16" # up "g'maj e'min c'maj d'maj" # room 5 # krush 9 # gain 0.8),
    -- (4, 36, slow 2 $ s "superpiano*8" # up "d6  [c6 b5] <[~ ~]  [a5 b5]>" # sustain 3 # gain 1.6),
    (0, 16, slow 1 $ s "[bd bd sd ~] [bd bd sd bd]" # gain 1.6),
    -- (12, 36, slow 2 $ s "yeah*16" # up "<[a6 b6] [a6 b6 c7 [b6 a6 g5 fs5]]>" #gain 5),
    (8, 20, slow 2 $ s "flute*4" # up "<[g5 [a5 ~] c5 ~] [g5 [a5 ~] c5 ~]>" # sustain 3 # gain 1.2 #krush (range 0.3 0.8 rand)),
    (0, 16, ccv "<[10 30] [10 30 60 [10 30 90 127]]>" # ccn "0" # s "midi"),
    (0, 16, ccv "20  [40 60] <[40 60]  [90  120]>" # ccn "3" # s "midi"),
    (0, 16, ccv "<[120 [60 ~] 40 ~] [20 [40 ~] 120 ~]>"# ccn "4" # s "midi"),
    (4, 20, slow 2 $ s "yeah*16" # up "<[a6 b6] [a6 b6 c7 [b6 a6 g5 fs5]]>" #gain 5)
  ];
  -- d2 silence;
  d3 silence;
}

chorus2 = do {
  d2 $ qtrigger $ seqP [
    -- (0, 4, slow 4 $ s "hh*16" # gain (range 0.8 1.2 saw) # speed (range 0.4 3 saw)),
    -- (0, 16, slow 4 $ s "superpiano*8" # up "d4 e4 fs4 g4" # gain (1.2) # room 0.9 #krush 4 #lpf 2000 #sustain 2),
    (0, 4, slow 4 $ s "superpiano*8" # up "d4 e4 fs4 g4" # gain (range 0.4 1.2 saw) # room 0.9 #krush 4 #lpf (range 2000 3000 saw) #sustain 2),
    (4, 16, slow 4 $ s "superpiano*16" # up "g'maj e'min c'maj d'maj" # room 5 # krush 9 # gain 0.8),
    (4, 16, slow 2 $ s "superpiano*8" # up "d6  [c6 b5] <[~ ~]  [a5 b5]>" # sustain 3 # gain 1.6),
    (4, 16, slow 1 $ s "[bd bd sd ~] [bd bd sd bd]" # gain 1.6),
    (4, 16, slow 2 $ s "yeah*16" # up "<[a6 b6] [a6 b6 c7 [b6 a6 g5 fs5]]>" #gain 5),
    -- ( slow 2 $ s "flute*4" # up "<[g5 [a5 ~] c5 ~] [g5 [a5 ~] c5 ~]>" # sustain 3 # gain (range 1.2 0.4 saw) #krush 0.3),
    (4, 20, slow 2 $ s "flute*4" # up "<[g5 [a5 ~] c5 ~] [g5 [a5 ~] c5 ~]>" # sustain 3 # gain 1.2 #krush 0.3),
    (4, 16, ccv "<[10 30] [10 30 60 [10 30 90 127]]>" # ccn "0" # s "midi"),
    (4, 16, ccv "20  [40 60] <[40 60]  [90  120]>" # ccn "3" # s "midi"),
    (4, 16, ccv "<[120 [60 ~] 40 ~] [20 [40 ~] 120 ~]>"# ccn "4" # s "midi")
  ];
  d3 silence;
}

-- d3 $ slow 2 $ s "flute*4" # up "<[g5 [a5 ~] c5 ~] [g5 [a5 ~] e6 ~]>" # sustain 3 # gain 1.6

verse = do {
  d1 $ qtrigger $ seqP [
    -- (0, 20, s "[bd bd sd ~] [bd bd sd bd]" #gain 1.4),
    (4, 20, slow 4 $ s "gtr*16" # up "g'maj e'min c'maj d'maj" # gain 1.1),
    -- (4, 20, slow 4 $ s "gtr:2*16" # up "g'maj e'min c'maj d'maj"),
    -- (8, 20, s "hh*2" # gain 1.2),
    (12, 20, slow 4 $ s "superpiano*8" # up "d4 e4 fs4 g4" # gain 1 # room 0.9 #krush 4 #lpf 2000 #sustain 2),
    (0, 4, slow 2 $ s "flute*4" # up "<[g5 [a5 ~] c5 ~] [g5 [a5 ~] c5 ~] >" # sustain 3 # gain 1.3)
  ];
  d3 $ qtrigger $ seqP [
    (4, 20, slow 4 $ ccv "[30 40]  <50 20 60 80> 90 120" # ccn "0" # s "midi")
  ];
}

d1 $ slow 2 $ s "flute*4" # up "<[g5 [a5 ~] c5 ~] [g5 [a5 ~] c5 ~]>" # sustain 3 # gain 1.6

verse

chorus

chorus2

hush
Hydra Code:
shape(()=>cc[0] * 5, 0.001, 0.4)
  .color(0, 0.5, 0.2)
  .repeat(3.0, 3.0)                                     //2
  .modulate(voronoi(0.3, 0.6, ()=>cc[3] * 5))
  .rotate(() => time/10)
  .scrollY(() => time/10)
  .scrollX(() => time/10)
  .modulateKaleid(osc(()=>cc[4] * 2))                //3
  .modulate(noise(()=>cc[4] * 2))                    //1
  .out()

hush()